This should also work for PVM-9L1, PVM-14L1, SSM-20L1 (confirmed) and in the end also other monitors using TDA9394H jungle, at least if you can get to the service menu. Note that capacitor numbers will be different for others. Check the service manuals and verify according to the jungle pins.
So a guy approached me because he had a PVM-20L1 without RGB, and asked if it was possible to mod it for RGB SCART. The unit uses a TDA9394H jungle which is very sparsely documented on the web. There are some mentions of it on the RGB mod thread on shmups and some different documents at least showing the pinout. These pinouts show that it has a separate RGB/YUV input on pin 50 (INSSW2/blanking), 51 (R2/Y), 52 (G2/U), 53 (B2/V), so that is our point of interest. Now the jungle is one of Philips’ which are known to have bits to disable/enable these kinds of inputs through I2C, usually the bit is called IE1 or IE2 (for Interrupt Enable), and this is no exception.
Enabling RGB
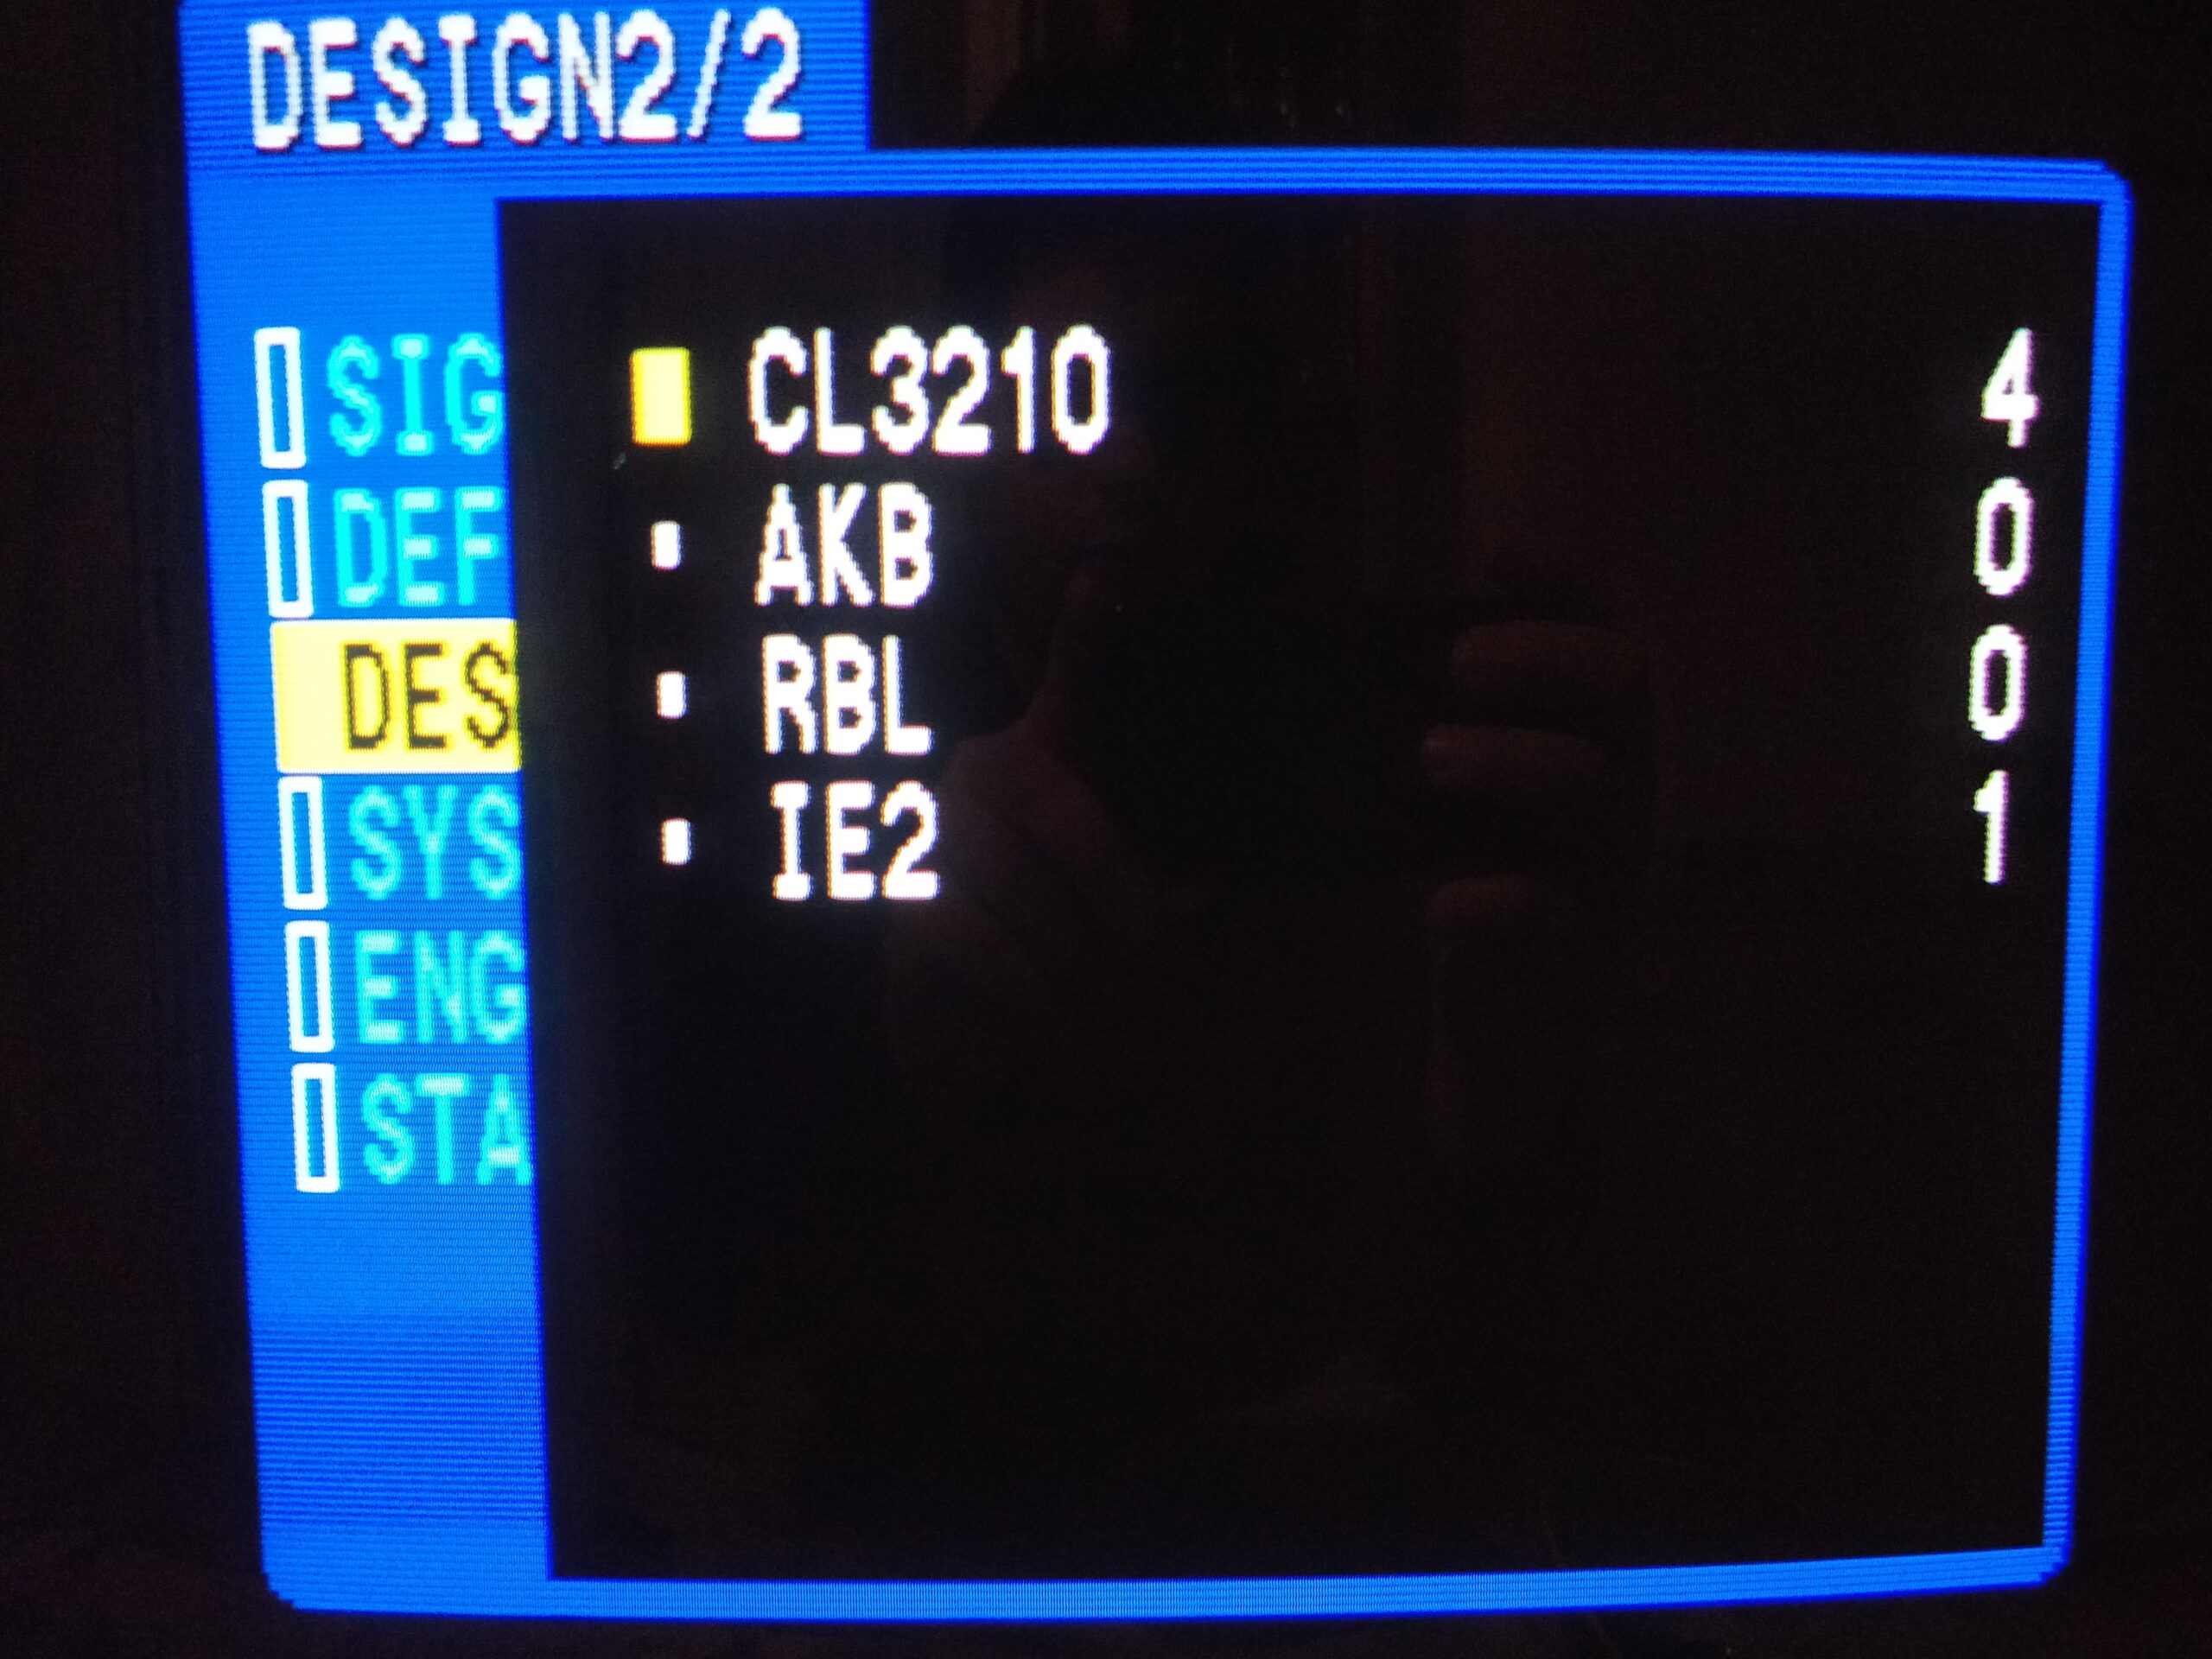
Looking in the service manual for the PVM-20L1 there is a walkthrough of the service menu, where the IE2 bit is shown/mentioned, and that relates to this external input. Thus we need to enable this bit.
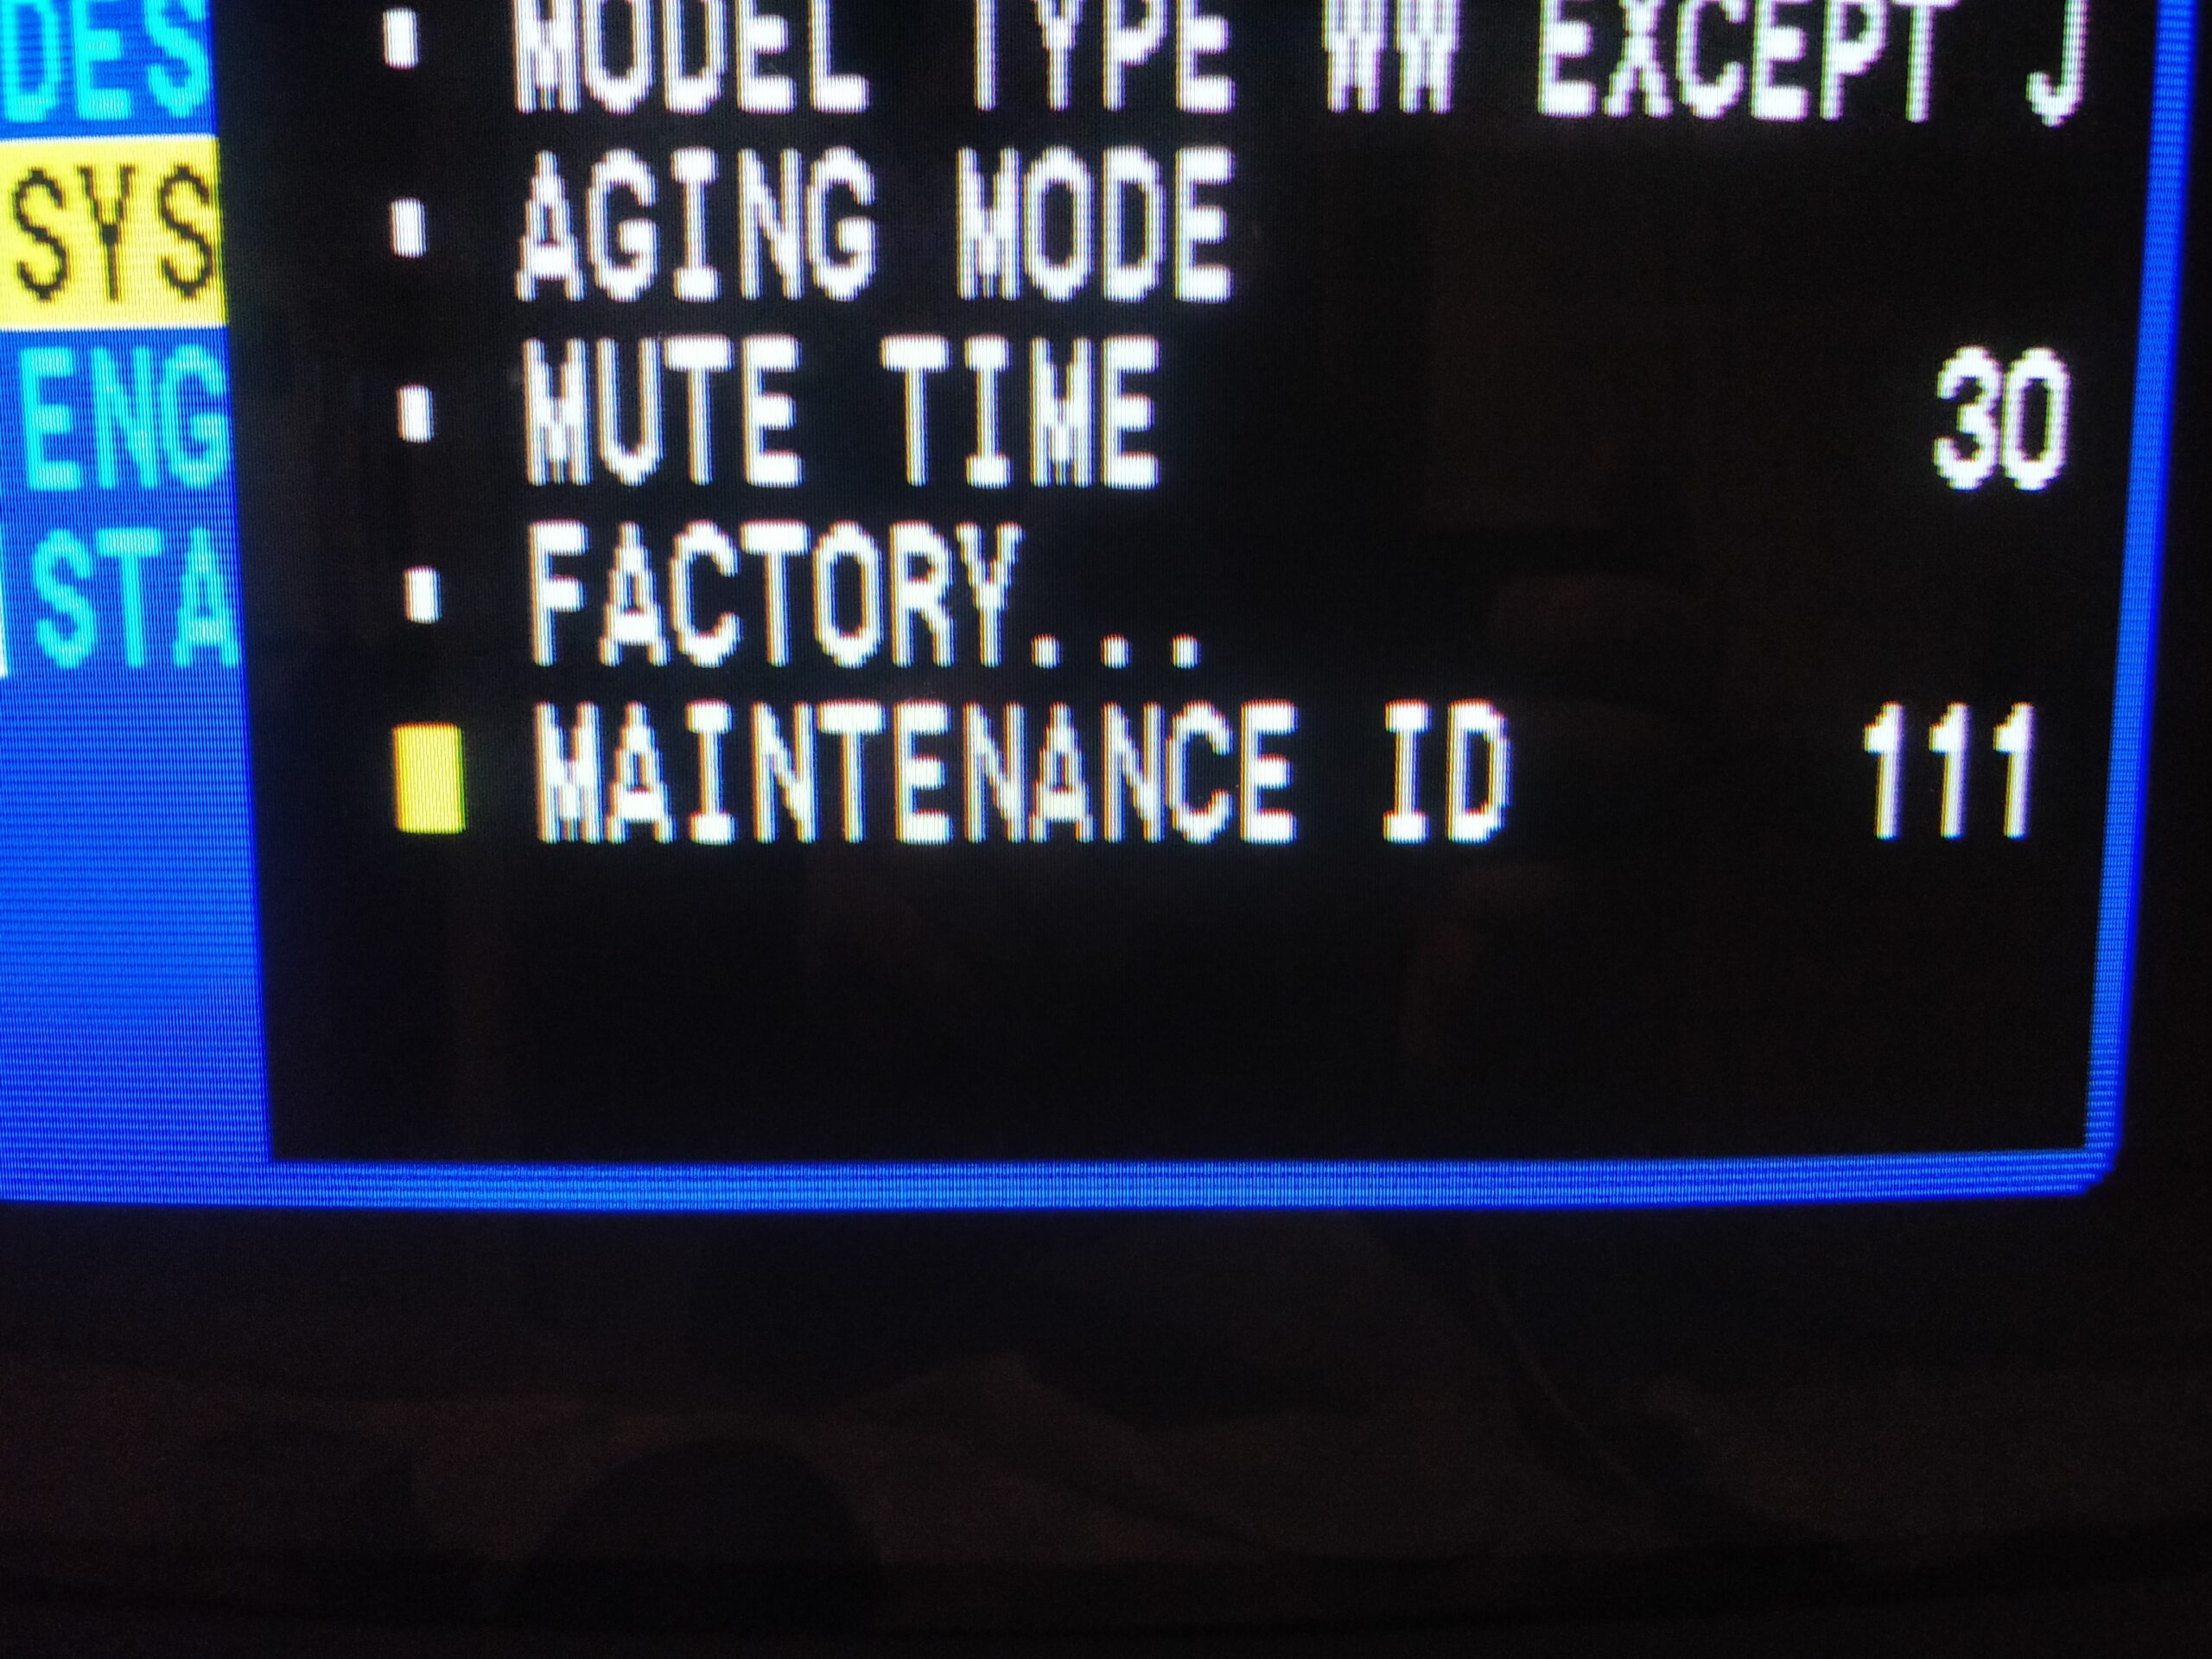
TLDR; Open the service menu (Menu then Menu+Enter for 5 sec), SYS->Maintenance ID=111, DES->CONTROL0->IE2=1, ENG->Comb filter=Forced, save by Menu+Enter for 5 sec.
The service menu is accessed by pressing Menu once (so the “normal” menu comes up) and then pressing Menu and Enter simultaneously for 5 seconds.

Using + and – keys and “Enter” (“Menu” goes back), go to SYS and change Maintenance ID to “111”, press “Enter” to accept.

Then go to DES (Design) and into CONTROL0 (on “page 2”). Here the IE2 bit is found so set it to 1. Press “Enter” to accept the setting.
Right now, if we had everything hooked up, we’d see a nice RGB signal, BUT IT WOULD BE IN BLACK AND WHITE!!!1
So after going nuts about this, I talked to MarkOZLAD whom many might know from shmups and the RGB mod scene in general, and he hinted that he’d heard that the TDA93xx units needed CVBS for sync to have colors… Aha, so I tried this, and whaddyaknow, it worked.
Ok, but I have CSYNC cables for many consoles, so the suggestion was to create a board that encoded RGBS to CVBS and use that as sync source, to be able to support all RGBS inputs. This can be done “pretty” by using an RGB amplifier like THS7374 along with an AD724/725 RGB to CVBS encoder, and then feed the CVBS to sync, and RGBS to the TDA9394H. I actually begun a board for that, until I stumbled upon some people discussing the same jungle on the CRT Discord. Here a guy, “nut” had apparently fixed this (on a similar PVM I think) by changing “Comb filter” setting from “Auto” to “Forced”. Now this setting I had not seen, and I had been through them all (I thought) so I went back to the service manual, and goddamn, it was there, but NOT under the DES, but instead under ENG (and still needs “Maintenance ID” set to “111”). Flipping that, and glorious color was back! Thanks Mr. “nut”!

Now the “Comb filter” option is apparently since software 1.2, I don’t know what it looks like on earlier.
Hooking up RGB
So now to actually hooking up the wires. I will be using the SCART board which I’ve used several times, and I will be injecting each 0.7Vpp RGB signal directly through a 0.1uF capacitor, after 75 Ohm terminating them. The SCART board can be found here: https://oshpark.com/shared_projects/JpxJNG1c
The TDA9394H is situated underneath the main board, so in order to get to it, you need to more or less remove it from the monitor. Pull off the metal case and plastic back, by removing the screws. Pull it backwards a bit, then up. There are a lot of wires to disconnect, find what works for you best. Tip: The small grounding “clip” which there are two of on the tubes lower left back, has a small “release” that needs to be pushed backwards to remove it.
Remember to discharge everything (there seems to be bleeder resistors, so if you have left it unplugged after some time, seemingly there is no charge, but warning warning)!

So locate the jungle that looks like above, and locate the 4 capacitors, C065, C066, C067 and C068.

We need to remove them all, at least C065/66/67, but I took them all. For future reference changing C068 to a 1K resistor here might make sense, but I placed it elsewhere (and didn’t wanna take it all apart again).

Now injecting can be done on either the cap pad or on the small test/solder pads on the traces. I chose the test pads. Now C065 was blue/B2, C066 was green/G2, C067 was red/R2 and C068 was blanking/INSSW2.


Now bend the cables onto the other side, from the front, as the sides are not accessible due to the “rails” that the board slides into.

Attach the RGB to a circuit like this:

As stated, I have this on the SCART breakout board, but if you use other connectors like BNC, do your thing. Note that when IE2 bit is on, INSSW2 is weakly pulled to 5V. Thus if you need to switch to composite, you should add a 1K resistor between blanking and GND, and switch that, or add the resistor and blank with 5V (I use RGB blanking/pin 16 from SCART).
Add sync directly to the BNC inputs (on the PCB) and the same for mono-mixed audio to RCA input. I used input B.

So with that, turn on, select input B, and RGB input on 20L1 and friends is now possible! Then comes the fun of physically putting the SCART or BNCs or whatever somewhere…
Attaching SCART
I use the “normal” SCART breakout I’ve used before. R1-R3 should be 0 Ohm, R6-R8 should be 75 Ohm, C1-C3 should be 0.1uF. R4/R5 and C4 are thus unpopulated and JP1 is bridged as we connect directly to the composite input.
So the back plastic part is attached to the metal casing by some plastic rivets. Now these can be removed by simply putting a flathead screwdriver in and they pop out. It is however not a very durable solution in my experience, and I have no idea how easy it is getting spares, so I spent some time contemplating on how to attach the SCART to the back while still being able to remove the whole thing and not tear everything apart. The solution I came up with was soldering connectors to the SCART PCB thus making the wires detachable from the PCB.

Now as can be seen, I needed to make an opening in the side of my normal SCART bracket and then I designed a small detachable cover for it. To get the wires out, I clipped a little of the grille out. The designs including FreeCAD source can be found here: https://www.thingiverse.com/thing:4726360


The finished system then looks like this:


And of course some pictures

