UPDATE Read the last part about the 3.3V vs. 5V of the MN5814!
A guy on Facebook asked if it was possible to region mod a NTSC PSone with the original PSone screen attached, to be able to play PAL games also, to which I replied that as far as I knew, the screen is “region” locked, so PAL signals will give a rolling image, exactly like if your VHOLD on a CRT is “out of sync”. I remembered I had a banged up SCPH-130 monitor, which as far as I know is the first Japanese revision (unsure tho), and is thus NTSC, so I tried it out on my modchipped and DFO’ed EU/PAL PSone (SCPH-101), and true enough, when playing PAL games the picture would begin rolling.
Since the screen was already pretty banged up (not my doing) I decided to investigate and see if I could determine *what* was actually causing this.
It should be noted that there are several revisions out of this monitor, and I have no idea how other revisions work, so your mileage may vary.
Anyways, to disassemble the monitor, you need to remove the speaker grille, at least in the outer corners, as there are two screws in each side here. Note that I would assume it quite easy to destroy the grille (and end up with a result like mine), so take care.
When all screws are removed you should be able to pry the back cover off, and see the main PCB of the monitor:

So there are three large IC’s which is of interest here. IC12 in the middle which is an AN2526NFH signal processor (“jungle” IC), IC1 in the bottom which is a MN5814 “TFT AV Panel Controller IC” and IC3 which is a Wiseview LTS5QTB. The latter I couldn’t find any information about, but since it isn’t important, who cares.
So looking at IC12 it has a ~3.57MHz crystal, the color carrier frequency for NTSC composite signals, and thus is wired for NTSC. Looking at the datasheet, the unit does support PAL (with a 4.43MHz crystal instead, and another color trap filter), but since the PSone is connected via RGB, PAL/NTSC shouldn’t matter.
The MN5814 is apparently a controller for TFT panels, so I looked at the datasheet to see what its pins did. Here I noticed the NP1 (pin 46) which is labeled “NTSC/PAL” in the pin overview. This pin has a built in 100K pull-down resistor, and whaddaya know, there’s a test pad labeled NP1 on the SCPH-130 mainboard!
The datasheet I had didn’t mention much about what level did what, but measuring it out, it is pulled low by the internal resistor. I thought that I’d try to pull this high, so I did that, and voila, now NTSC was rolling and PAL video was steady! So to “fix” the issue, this pin needs to be toggled depending on the video type.
I tried looking around for a suitable signal, but couldn’t find any, but I found a bunch of VSYNC pads, including one called VOUT at the AN2526NFH.
There are 4 pads, bottom is labeled FIELD, next is VOUT, then HOUT and then BURST (VOUT, HOUT and BURST labels are further to the right just after the caps).
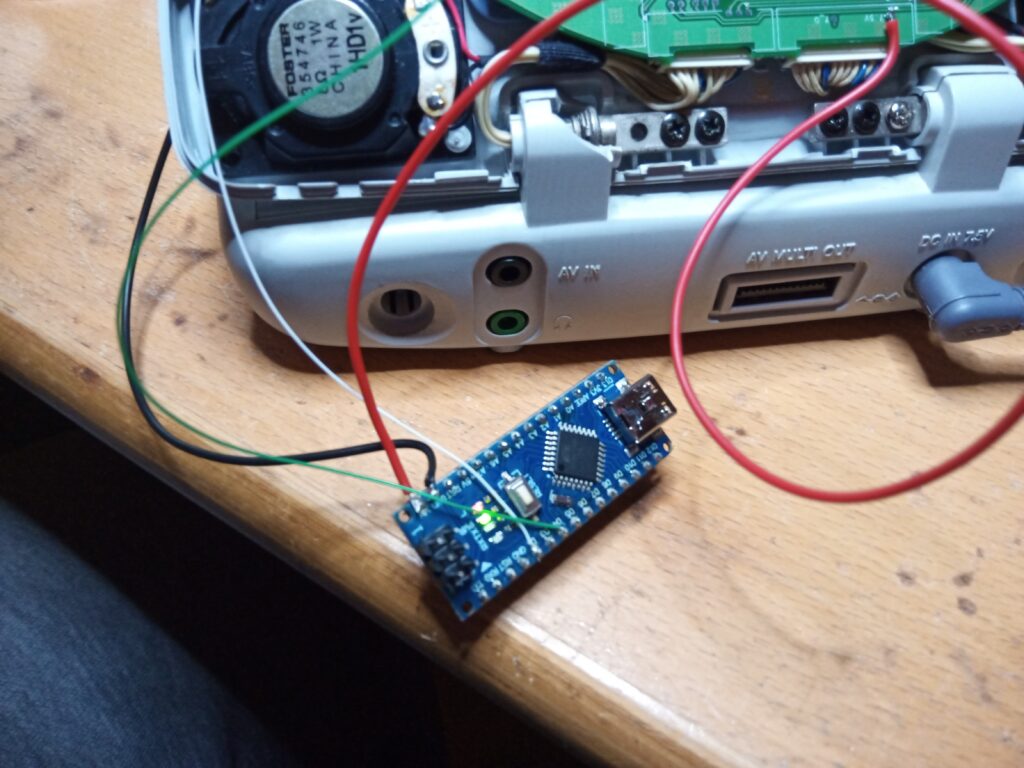
I took a scope and measured VOUT, and could read that it was the discrete VSYNC output. To prove that my hypothesis worked, I took an Arduino Nano, wrote a very small program that measured the VSYNC duration, and from that decides if the VSYNC is 50Hz or 60Hz. I do this by connecting VOUT to INT0/D2 (interrupt 0) so the MCU runs a piece of code when the signal changes state, and then measure the number of milliseconds from LOW to LOW (using millis() function). Above 18ms I decide it to be 50Hz (which is ideally 20ms) and below is 60Hz (essentially ~16,7ms). Below 12ms is considered “noise”. Applying the decision to an output and then connect that output to the NP1, and *pling* everything now works! You can find the code here: https://github.com/skumlos/frqdetector
Now this is very crude, I don’t even know where to put the Arduino, but maybe using a Mini Pro or any smaller footprint Arduino compatible board, or writing a version that works for the PIC12F508 which is really common for modchips, I suppose that would be much better (or any ATTiny or whatever).
The Arduino is powered by the 7.5V point in the bottom of the PCB near the hinge and whatever GND point.

UPDATE It was brought to my attention that the MN5814 is running on 3.3V and not 5V. Since the Arduino is (usually) running on 5V, it’s I/Os are also 5V. The MN5814 specifies that max. I/O voltage is VDD+0.3V (meaning there’s most likely a diode there) so it is advisable to run the NP0 output from the Arduino through a voltage divider, like two 1K resistors, and then pull the NP0 signal between the two.
Fun stuff! Any ideas or something for this? Let me know! martin@hejnfelt.com or skumlos/skum on various boards.


