Archive for February, 2020

Boot time difference on Arduino Nano v3.0 (clone) with and without bootloader

Saturday, February 29th, 2020

So I wanted to see what kind of delay the built-in bootloader of the Nano v3.0 clones I have was causing, so I created a small sketch which basically sets up a pin as output and turns it on. I then attached my logic analyzer and measured the time from reset is released until the pin goes high.

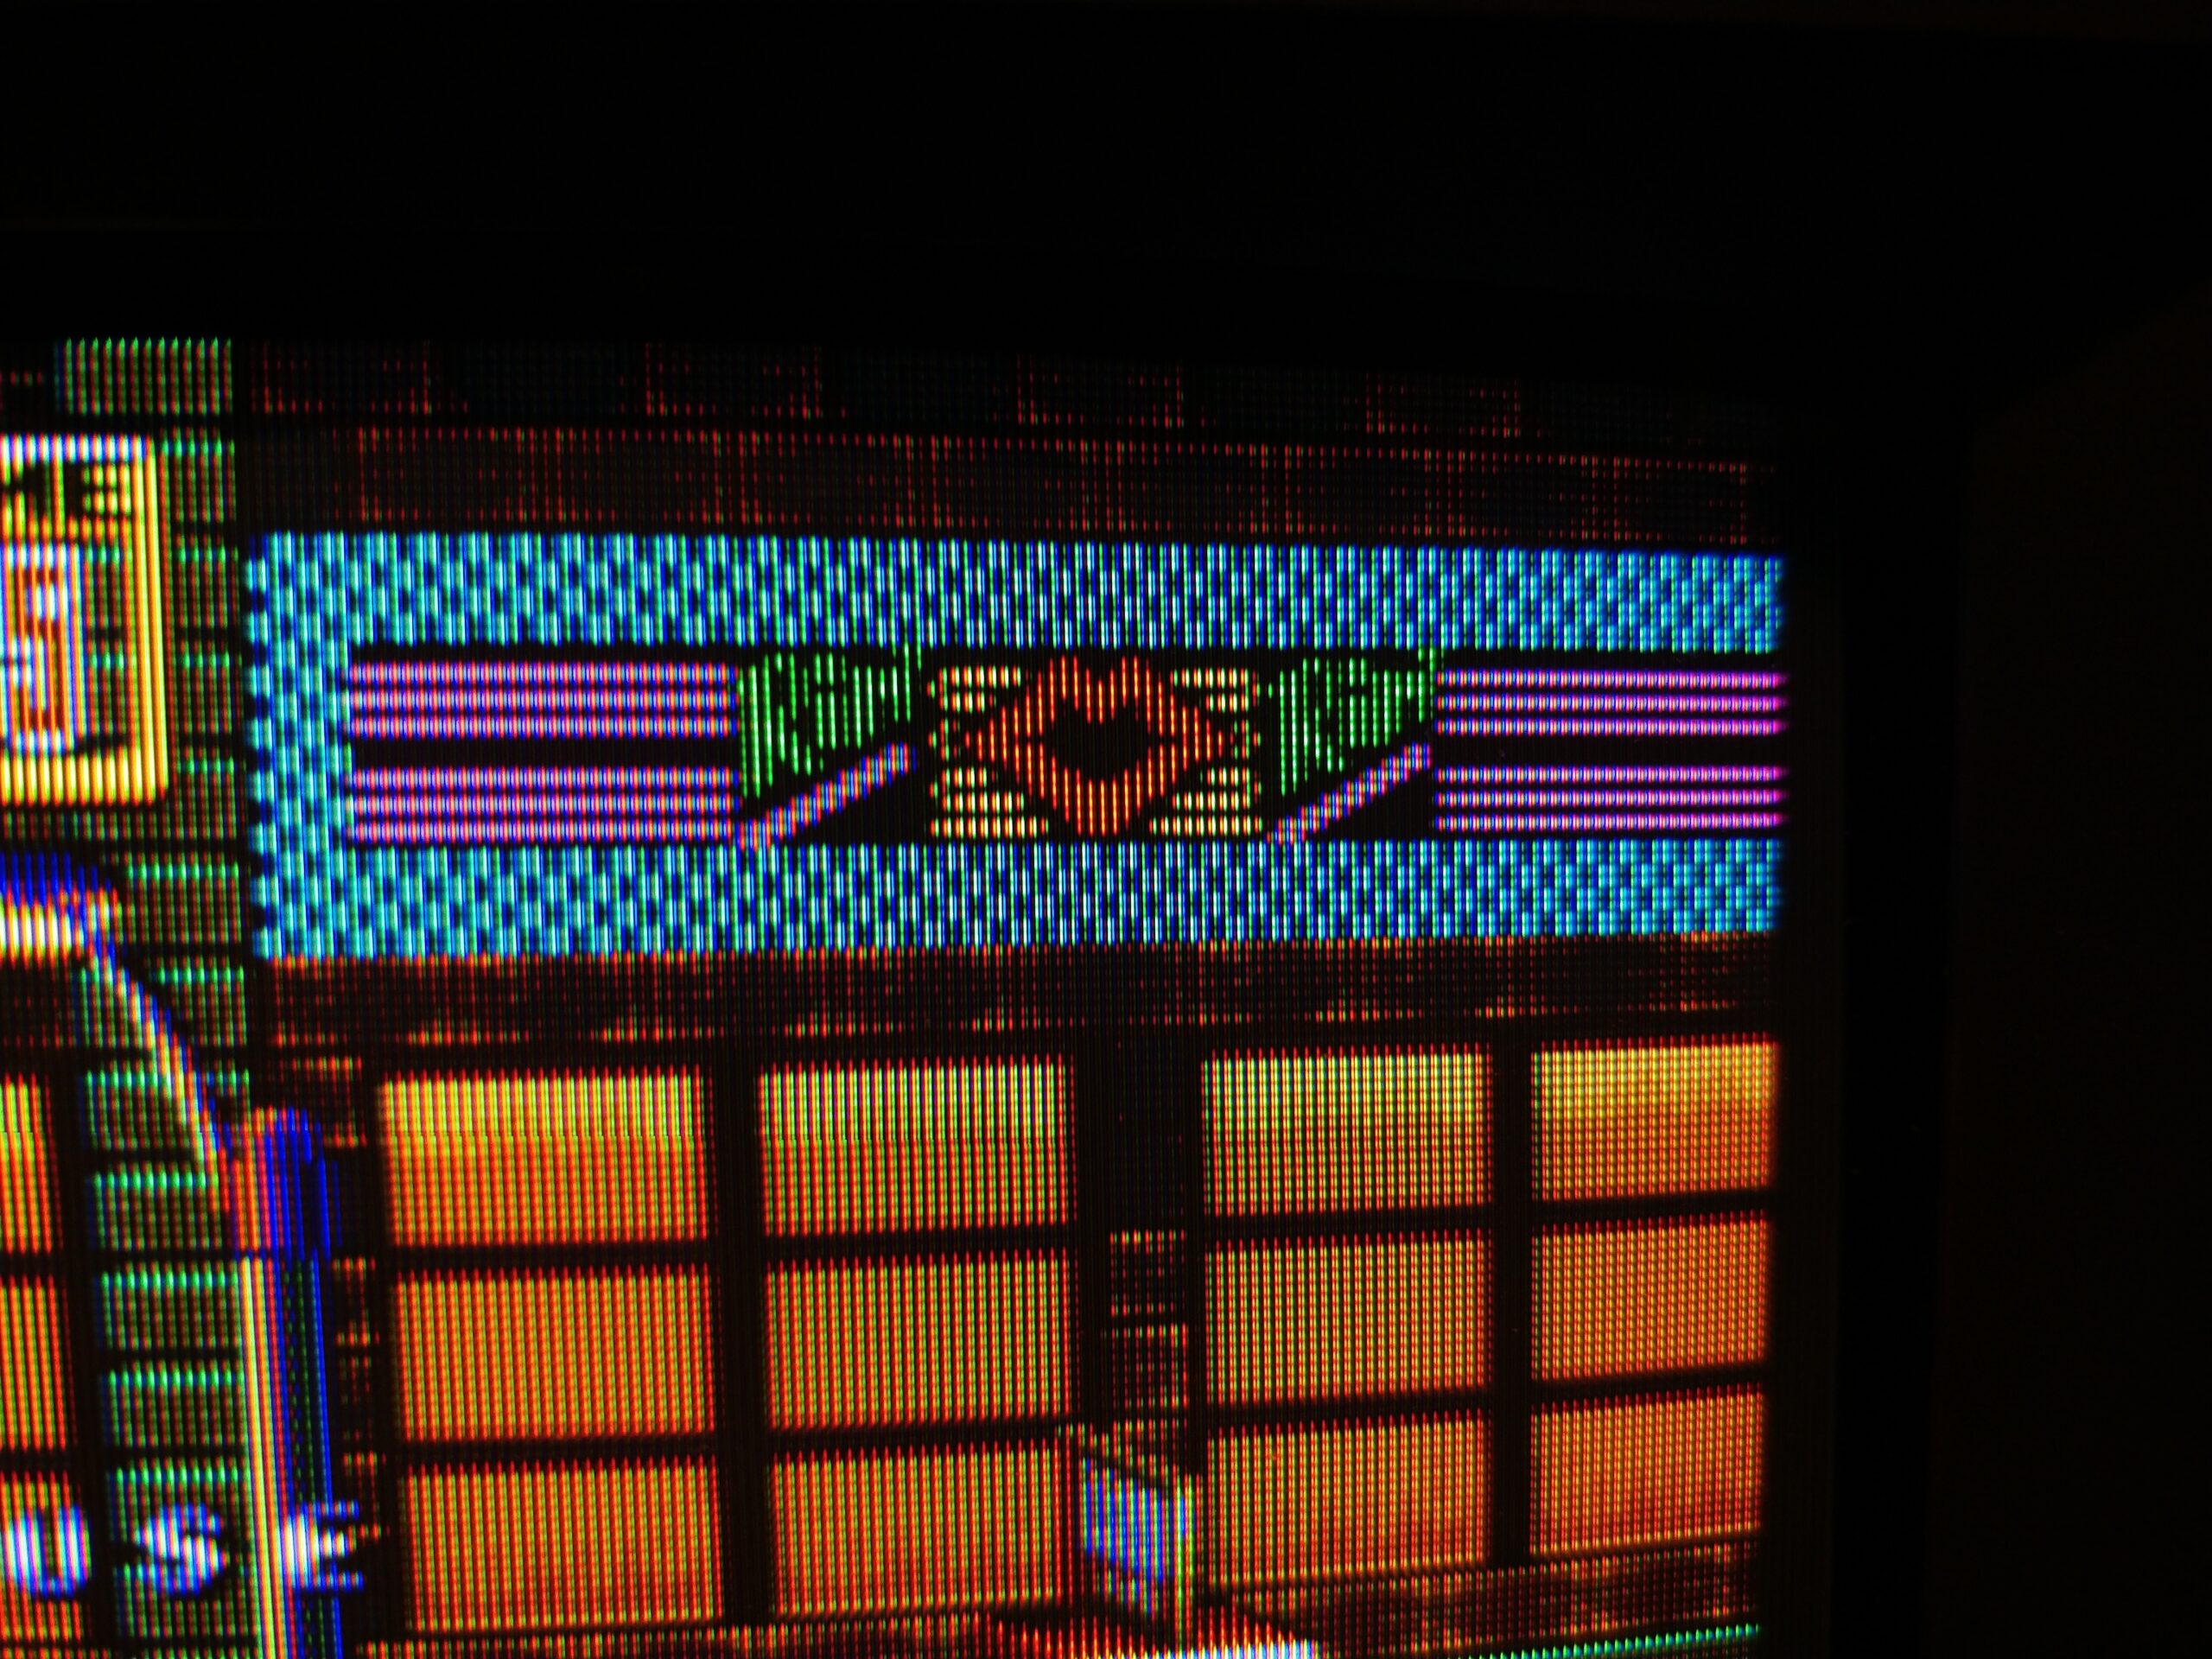
Here is the measurement of the sketch, uploaded through the serial port, meaning through the bootloader, meaning bootloader is active:

Nano v3 clone with bootloader active

So here, from I release the reset, until the test pin goes high, is a delay of ~1,46 seconds.

And now, with the sketch uploaded through ISP/ICSP, meaning bootloader is now destroyed (and board cannot be programmed through serial port unless a new bootloader is added):

Nano v3 clone without bootloader

So now, from I release reset, until the test pin goes high, is a delay of 70 ms. Purrty big diffewence!

You can verify that the bootloader is now gone by checking the red LED on the board. When power is applied, it will blink once during startup (that’s the bootloader) and then do whatever your program does afterwards, so if it doesn’t, the bootloader is gone.

Now there are other bootloaders available, much faster ones also, but this is the one built into all clone Nanos I’ve worked with.

Turning the Arduino Nano clone into a programmer

So in case you don’t have a programmer (ISP) you can turn one of those Arduinos you have in the drawer into one! The Arduino IDE has a sketch that can be uploaded to any Arduino basically and make it act like a programmer, which you can then use to program sketches directly into other Arduinos, thus removing the bootloader, and reducing boot time dramatically. Here’s how to do it for a Nano:

Start the IDE, press “File“, press “Examples“, choose “11. ArduinoISP” and then “ArduinoISP“. It will then load that sketch. Press “Tools“, press “Board“, select “Arduino Nano“. Press “Tools“, press “Processor“, select “ATmega328P (Old bootloader)“. The “Old bootloader” versions have been the ones I needed to select for all clones I’ve used. You also need to select the serial port it is attached to in “Tools“. Press “Upload” to put the sketch in. You should now have an Arduino ISP. To get a stable connection, it is necessary to add a ~10uF capacitor between the RST and GND pins (negative on GND, positive on RST) on the Arduino ISP. Like this:

10uF cap between GND and RST on the ISP Nano

This is a hardware-hack to circumvent the Arduino from resetting when the serial data from the computer arrives. It is important that this is done after the ArduinoISP sketch has been uploaded.

Now to use your new programmer, open the sketch you want to write, select the correct board of your target (in this case no difference), and in “Tools“, press “Programmer“, select “Arduino as ISP” (note: NOT “ArduinoISP”, as that is a separate piece of hardware). The serial port should be the same as your Arduino programmer is connected to. You then need to connect the following with jumper cables (programmer -> target):

D10 -> RST
D11 -> D11
D12 -> D12
D13 -> D13
5V -> 5V
GND -> GND

So quite easy for Nano -> Nano.

ISP Nano to the left and the target Nano to the right (and a Mini Pro top left, disregard that)

Then write the sketch by pressing “Sketch“, select Upload using programmer“. It should upload the sketch to the target, which now has zero bootloader, thus boots close to immediately. To reclaim the bootloader (or change it to another), simply press the “Burn bootloader” in “Tools“.

Creating a BKM-129X compatible board

Tuesday, February 18th, 2020

TL;DR Gerber files here (NOTE: These gerbers are outdated, and using the Github project is recommended!)

So in continuation of my previous post about reverse engineering the Sony BKM-129X the next logical step would be to actually create a functional card that is compatible with monitors that use the BKM-129X card. The first step I took was making a “clone” of the input circuit of the original card, but there are a lot of components, and especially one of them I had trouble finding a suitable replacement for (the 2SA1462 transistor). I am still unsure if the extremely fast switching speed (1.8GHz!) is needed, so I finished the design, with the intention of trying to build it at some point. The Kicad project can be found on Github, here’s Kicads 3D render.

3D render from Kicad of the BKM-129X “clone”

Now the design is 100% untested, but I am sure I’ll get around to actually building one at some point, even just to verify the design. If anyone actually builds one, please let me know how it went.

Making it cheap

When I was reverse engineering the card I ended up having a close to complete “harness” wired into the monitor, except for the video signals. While designing the clone card above, I came up with the thought of simply wiring buffered signals straight into the inputs, as this is really the only thing the board does besides some on/off switching of the signals. So an obvious buffer system nowadays is the quite common THS7374 IC I had lying around anyways for other retro projects, so I hooked up the signals from that into the monitor, and it actually looked quite good. The only thing then missing would be the switches to disable all the outputs, and toggling external sync on and off. Since the THS7374 buffers all 4 channels, the obvious choice would be to insert a simple quad SPST analog switch IC after the THS7374, with three of the switches’ enable signals coupled together to the ~BX_OE signal from the MCU (for the RGB lines), and the last to ~EXT_SYNC_OE coupled to the sync line output. This would then make the whole card require only 2 IC’s (and a couple of capacitors and resistors) to form the complete video signal path circuit. The switch IC I ended up with is the ADG1611, which is a rather expensive chip (~$6) however it has a very low on resistance (1 Ohm) on each channel, and although I add current limiting resistors afterwards, when I designed it, I preferred having to add resistance than being unable to reduce it (had I chosen a switch IC with a higher on resistance). The switch can be powered up to +/- 8V, to be able to carry negative signals also, which is perfect as the BKM-129X is fed +/- 6V from the monitor. The THS7374 can run off 3-5V, so I put a cheap 3.3V LDO in, fed from the +6V so only a single regulator is needed. I ended up “cloning” most of the circuit between the monitor and the MCU, as some monitors allow multiple cards, and I wanted to be sure the load would match the original cards. It’s mostly some resistors and then the 74VHC125 chip which is cheap anyway. Thus the finished prototype card ended up looking like this:

The cheap BKM-129X compatible (prototype)
Note the MIC3940-3.3 listing is wrong, it’s MIC3490-3.3, and 74LVC125 is a 75VHC125 in a TSSOP14 package

The connections (from top) are Y/G, B/B-Y, R/R-Y, sync.

The complete price then basically consists of:
THS7374 – $1
ADG1611 – $6
74VHC125 (TSSOP14) – $0.5
Arduino Nano v3 clone (5V/16MHz) – $3
MIC3490-3.3 – $0.5
DTC144EKA – $0.2
64-pin connector – $1.5
BNC plugs – $5
Passive components (resistors/capacitors) – ~$3
PCB at JLCPCB – $3

All the resistors and capacitors are 0805 size except for the large 100uF/16V aluminium electrolytical which are 6.3×5.3mm.

So roughly $25 for the complete board… Beats $150 for the BKM-129X on eBay 🙂

The Kicad project can be found on Github.

I made a 3D printed bracket, which at the moment only fits my prototypes, as they’re a bit too deep (that is fixed in the Kicad project). I will redo it for the current one soon. The prototype when mounted in my PVM-9L2 then looks like this:

The card mounted in my PVM-9L2, only the prototype protrudes like this.

The bracket “grabs” the board and keeps it in place both from being pulled out when plugs are unmounted but also from moving side to side.

How the bracket holds the card

I have, for now, only tested on the PVM-9L2. The MCU code has been verified to work on a BVM-D14H5 also, so I am pretty sure it will work on the rest also. UPDATE Please read the part in the reverse engineering post regarding this (essentially you need to remove the bootloader).

Here are some photos from the card running in my PVM-9L2. Note they’re taken with my phone, and doesn’t represent how good it actually looks, but you’ll get the idea.

Streets of Rage 2 on SEGA Mega Drive 2 (60Hz modded)
Closeup
Mega Man X on SNES
Gee what game is that?
Component/YPbPr with internal sync works fine also

You are welcome to copy, produce, sell the boards based on my work, actually please do!

The bracket kan be found here: https://www.thingiverse.com/thing:4178104 (thanks to Nick Carney for the version which has signal designators on).

Update

Preliminary results with the BVM-D9H series is that it’s not sync’ing. To make it work, R9 should be removed and a jumper inserted (most likely smaller 10-33 Ohms will be good also). Doing this should not affect other monitors.

Remember to refer to the previous posts about how to program the Arduino for maximum compatibility.

If you have any experiences with the project you want to share, feel free to contact me on Facebook (Martin Hejnfelt), Discord (skum), shmups (skum), email to martin@hejnfelt.com or whereever you might find me. Please no more “Do the BKM-68X” though 😛

Update 2

Aaaaayyy I did the BKM-68X anyways 😛 https://immerhax.com/?p=624